DNS Record Configuration for GoDaddy
ื๎ะยฒฉฒสอ๘ีพ Mail provides multiple options to verify your domain ownership and configure email delivery in GoDaddy. If you are migrating your email from GoDaddy to ื๎ะยฒฉฒสอ๘ีพ, refer to our GoDaddy email transition guide to explore ื๎ะยฒฉฒสอ๘ีพ Mail's features. This help page explains to add a domain to your existing ื๎ะยฒฉฒสอ๘ีพ Mail account and configure the DNS records. Refer to setting up a domain in ื๎ะยฒฉฒสอ๘ีพ Mail to set up a new domain in ื๎ะยฒฉฒสอ๘ีพ Mail.
One-Click Verification - GoDaddy
ื๎ะยฒฉฒสอ๘ีพ Mail supports one-click verification for domains hosted with GoDaddy. Using this method, you can verify your domain, and add MX records easily without having to add them manually. To use one-step verification, follow these steps:
- Log in to and select Domains from the left pane.
- Select Add, enter your domain name and click the Add button.

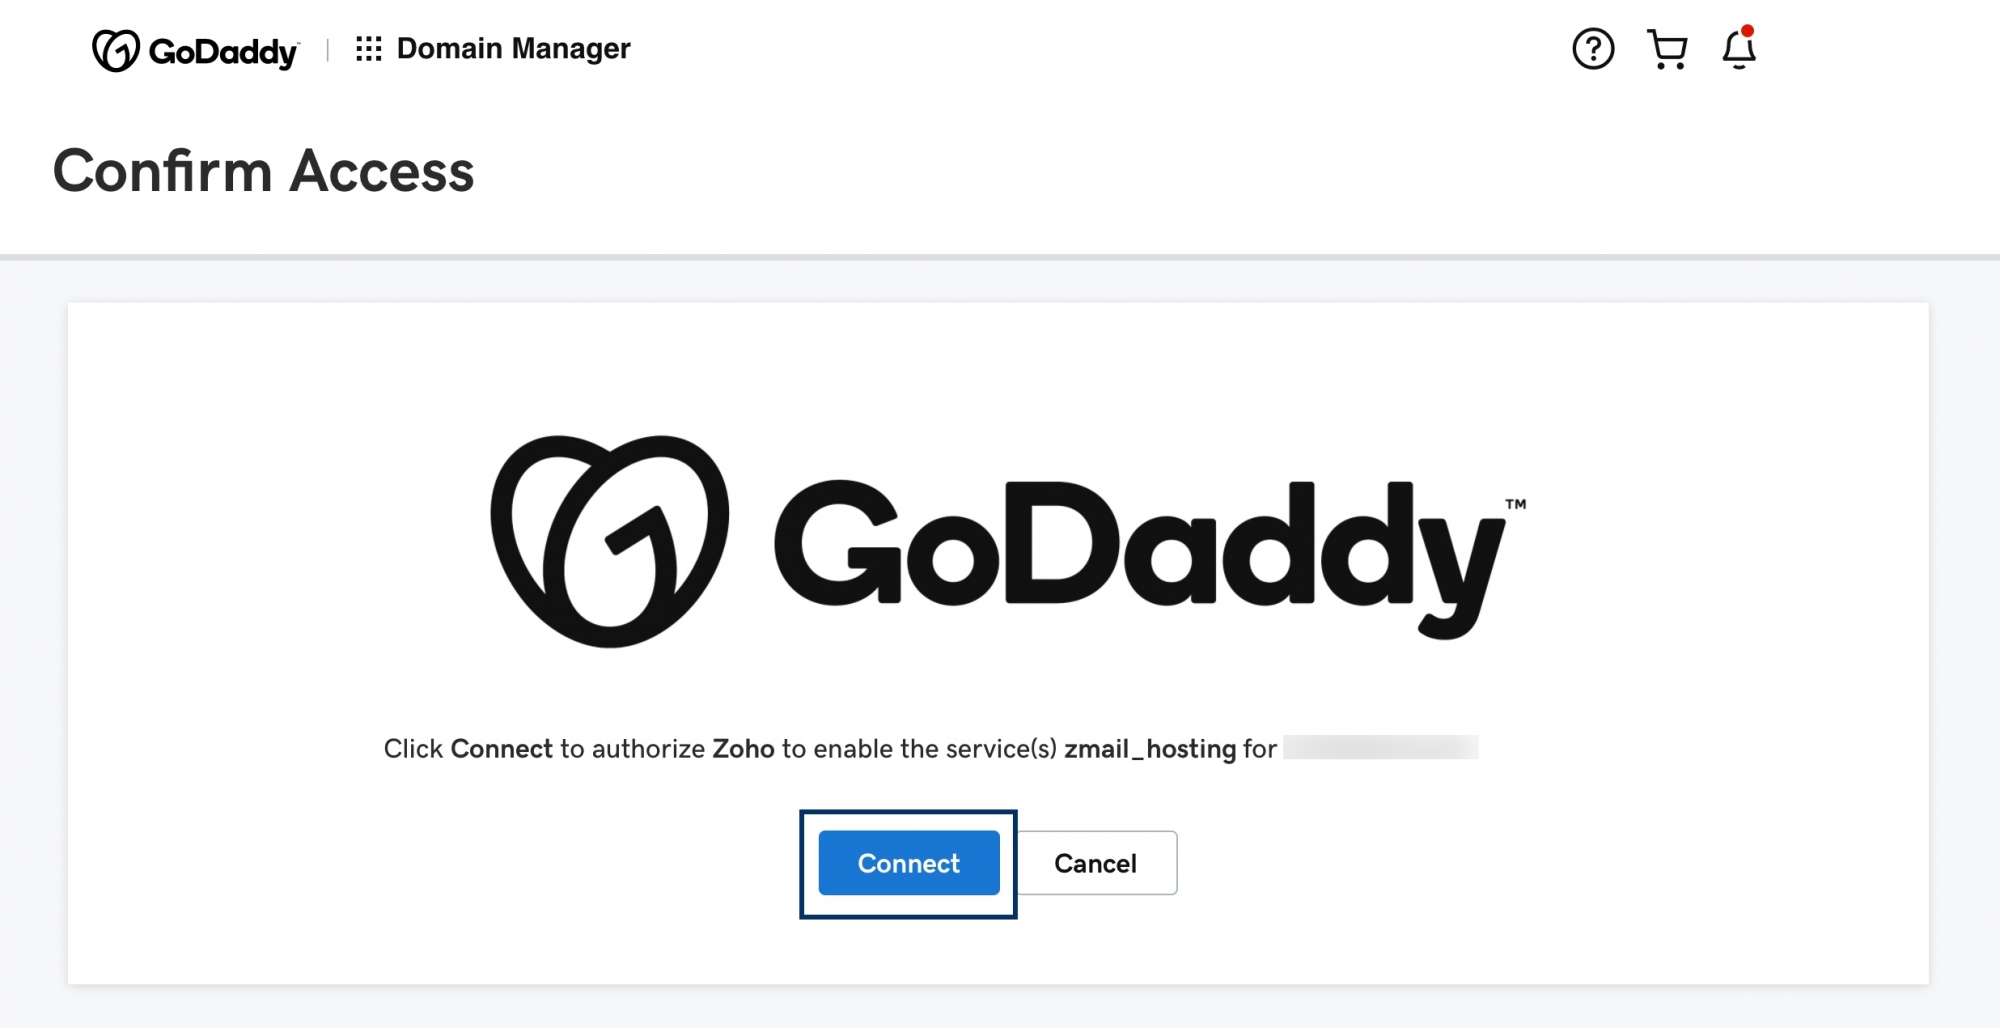
- Click Login to my DNS on ื๎ะยฒฉฒสอ๘ีพ Mail's domain verification page. ื๎ะยฒฉฒสอ๘ีพ Mail automatically identifies your domain provider and the GoDaddy Sign in page opens.
- Log in with your GoDaddy credentials and click Connect. Your domain verification is now complete.
- Click Proceed in Admin Console to configure your organization's DNS records and click Configure Now.
Once you verify your domain with the one-click verification method, you can navigate to the MX, SPF and DKIM sections under Email Configuration in Admin Console and click Verify in order to validate your DNS records. If the DNS information is correctly propagated, the domain will be verified. You can proceed with the next steps to create user accounts.
Manual domain verification via TXT - GoDaddy
If the DNS Manager for your domain is hosted with GoDaddy, follow the steps below to add a TXT Record and verify the domain:
- Log in to your .
- Locate the domain for which you need to add a TXT record and click Manage DNS.
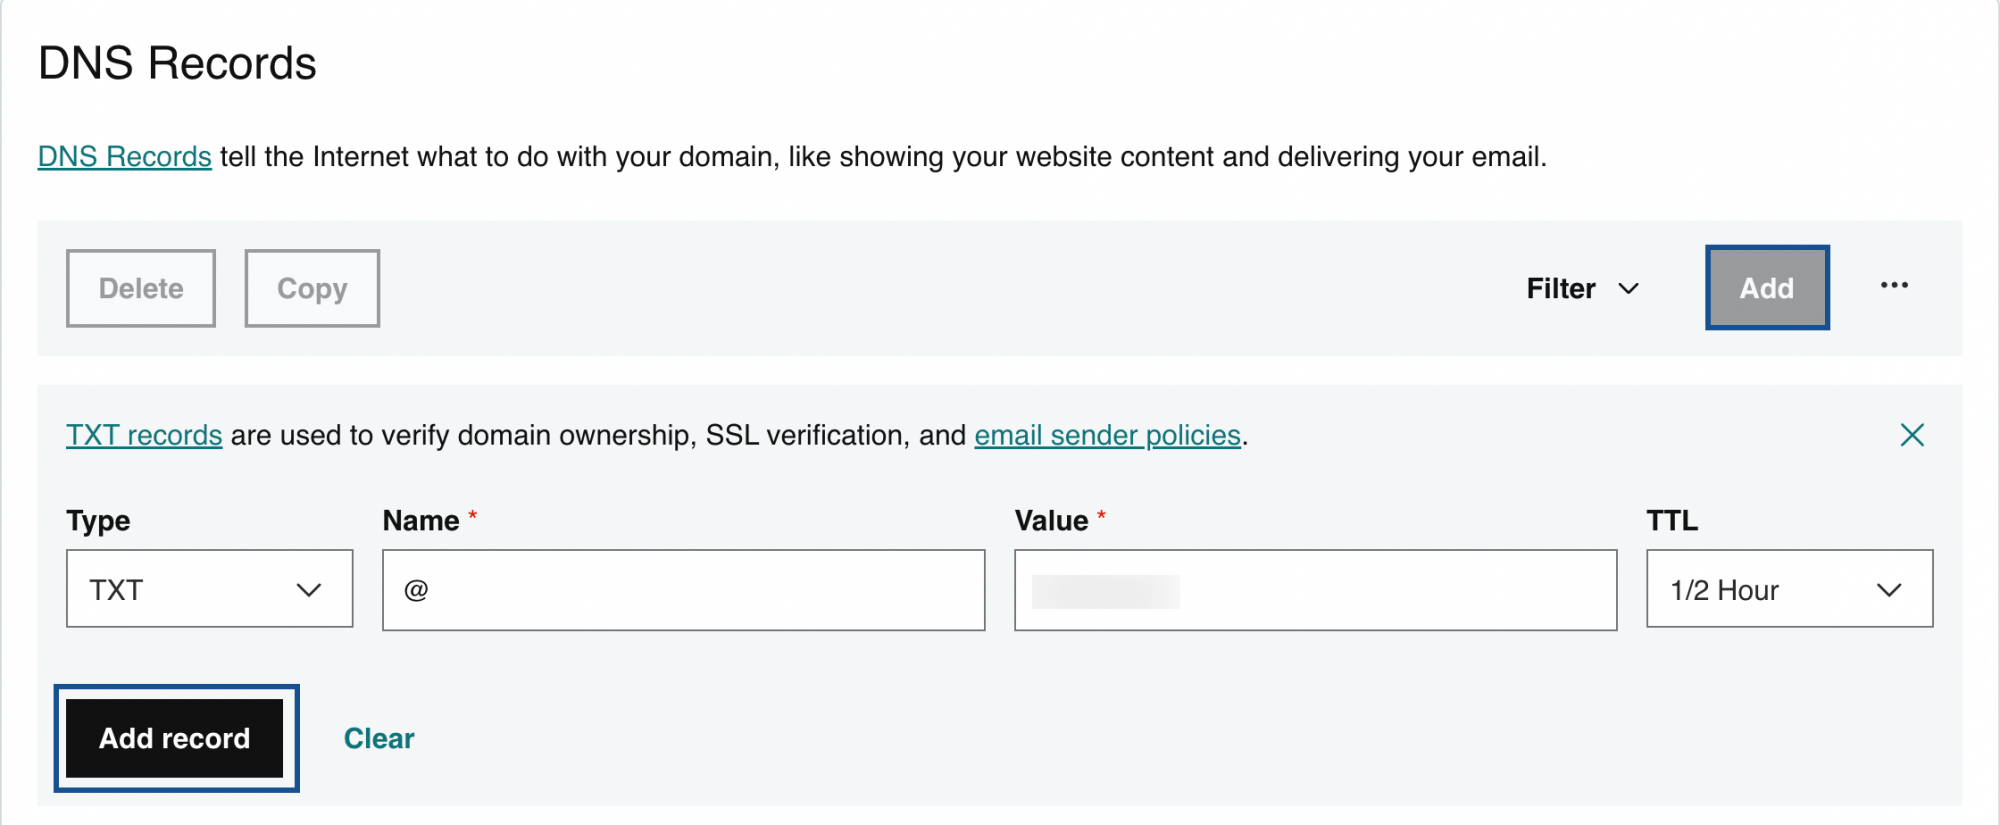
- Select ADD from the top right of your existing DNS records.
- Choose TXT from the Type drop-down.
- In the Name field, enter @.โ
- In the Value field, enter the TXT value generated in the .
- Select the shortest possible time in the TTL drop-down and click Add record.
- Now come back to the domain verification page and click 'Verify by TXT'.
- If the DNS information is correctly propagated, the domain will be verified. You can proceed with the next steps to create user accounts.
Manual domain verification via CNAME - GoDaddy
Follow the steps below to add a CNAME and verify the domain:
- Log in to your .
- Locate the domain for which you need to add a CNAME record and click Manage DNS.
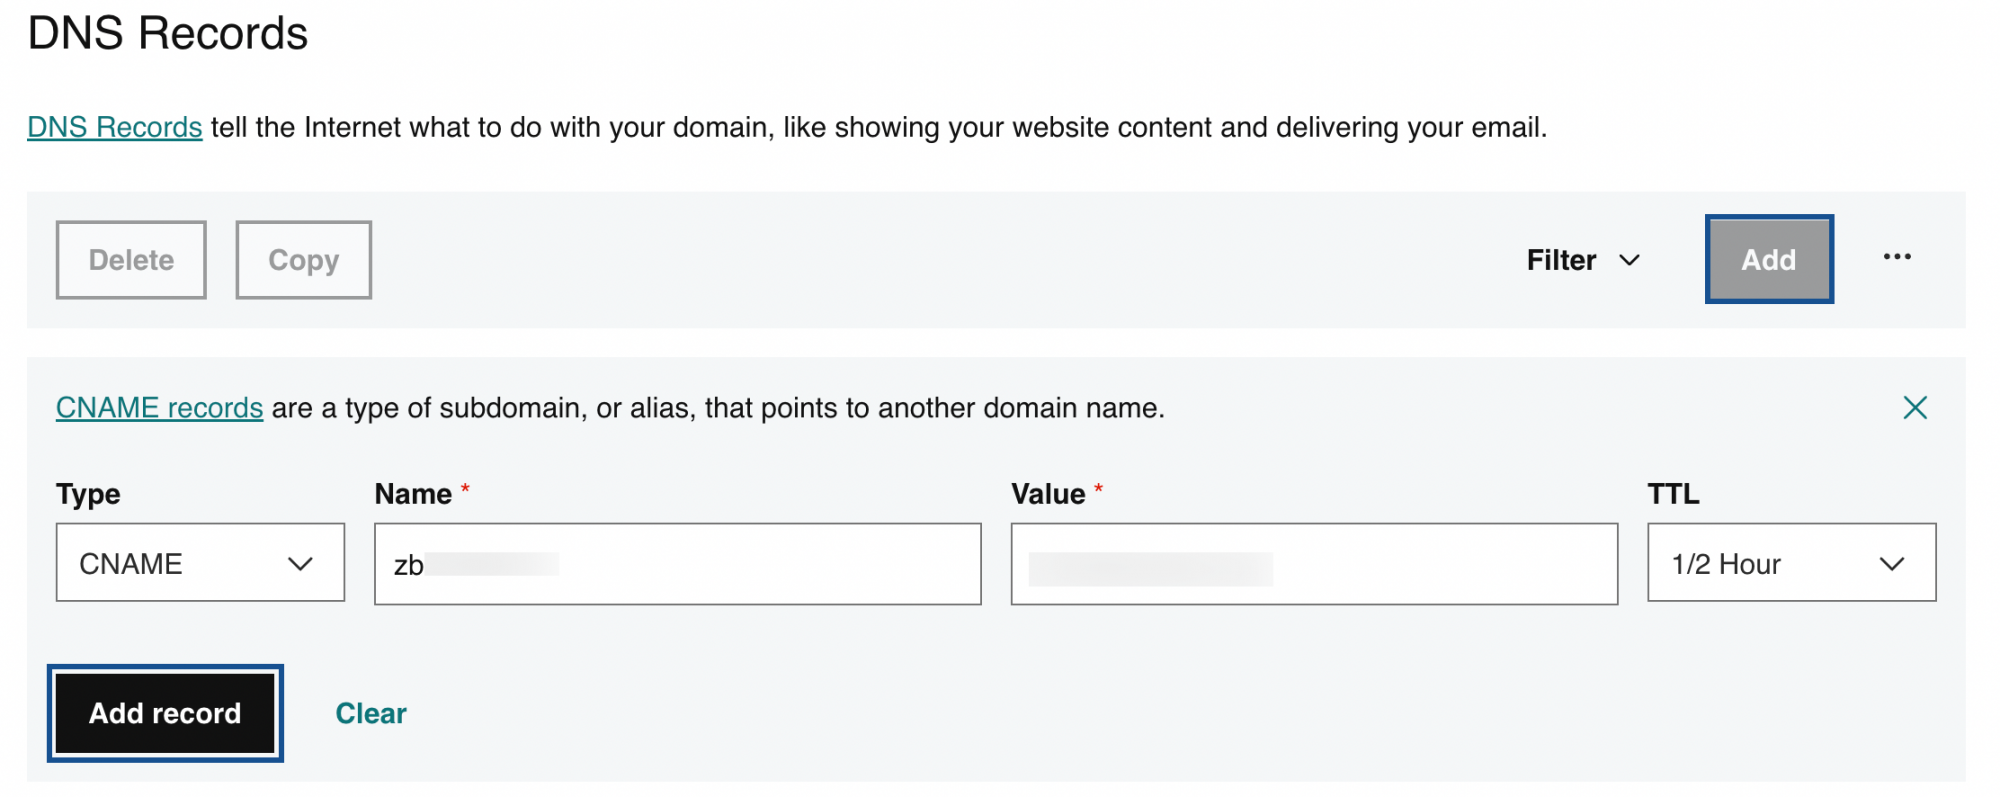
- Select ADD from the top right of your existing DNS records.
- Choose CNAME from the Type drop-down.
- In the Name field, enter the unique zbcode (zb**) generated for your domain in .
- In the Value field, enter the value from the CNAME Value/ Points To/ Destination field of your ื๎ะยฒฉฒสอ๘ีพ Mail Admin Console.
- Select the shortest possible time in the TTL drop-down and click Add record.
- Now come back to the domain verification page and click 'Verify by CNAME'.
If the DNS information is correctly propagated, the domain will be verified. You can proceed with the next steps to create user accounts.
Note:
You have now added the CNAME/TXT record successfully. Upon successful propagation, click the Verify by CNAME/Verify by TXT button in the ื๎ะยฒฉฒสอ๘ีพ Mail setup wizard to verify the domain and proceed further.
Configure MX, SPF, and DKIM Records - GoDaddy
If your domain's DNS Manager is hosted with Go Daddy, follow the below steps to add MX records for your Domain for email delivery, add SPF and DKIM records to prevent spoofing of your domain email address.
- Log in to your .
- Locate the domain for which you need to configure DNS records and click Manage DNS.
- Follow the below instructions to add MX Records:
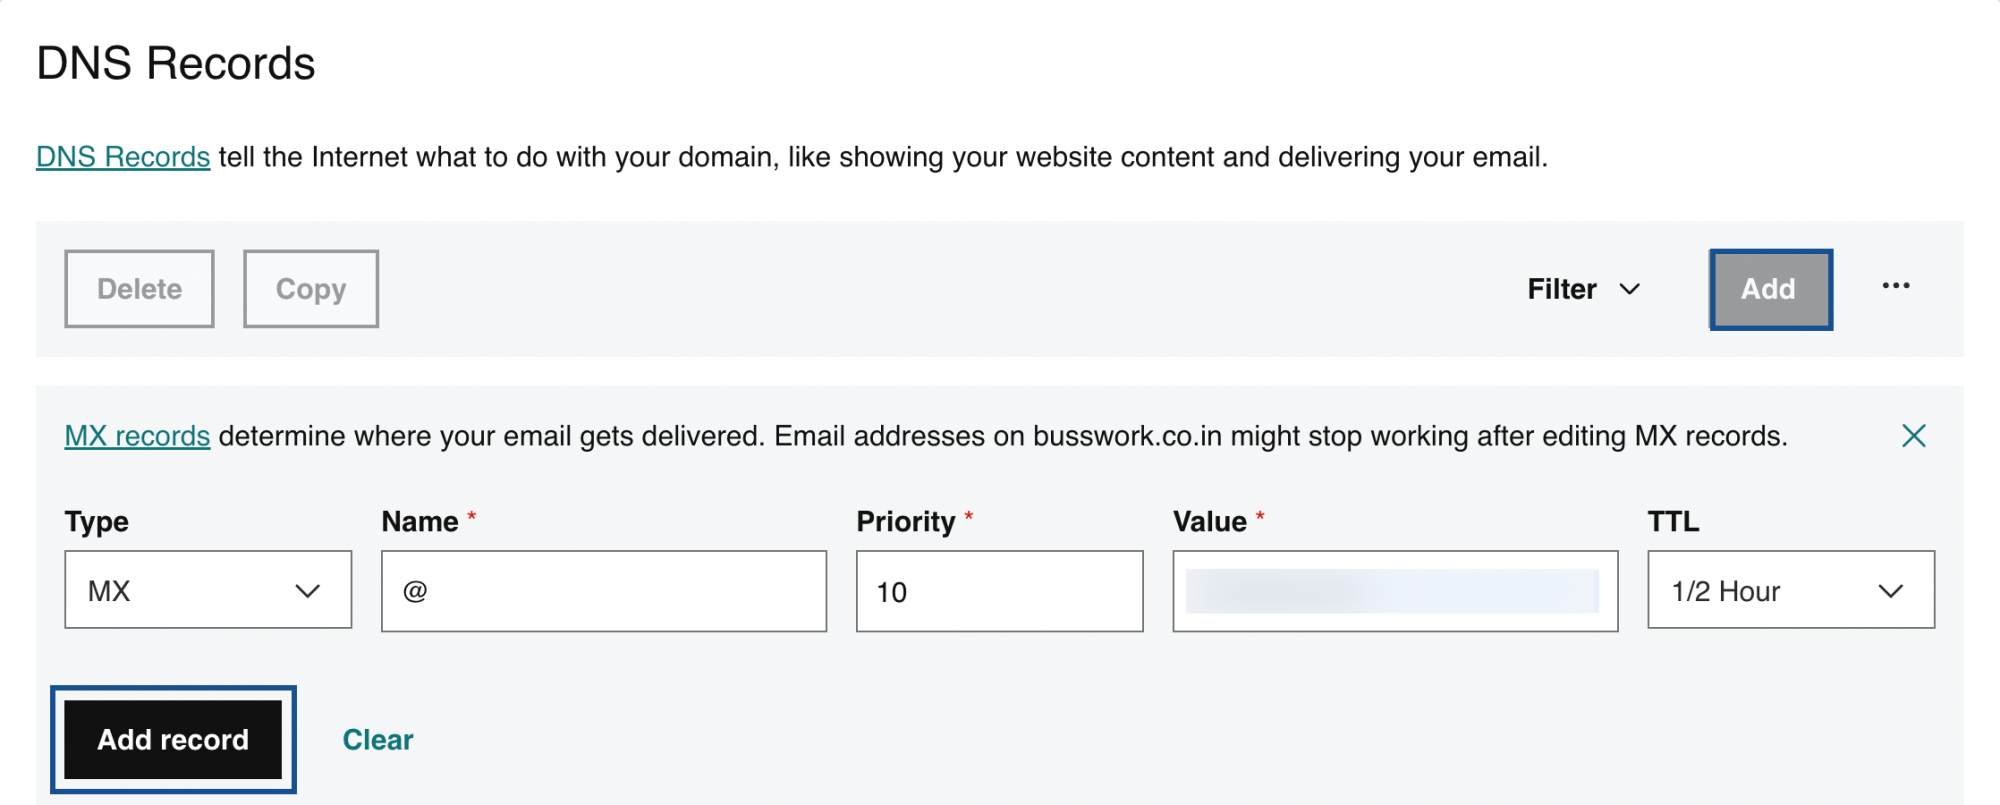
- Select Add from the top right of your existing DNS records. The existing DNS records appear.
- Select MX from the Type drop-down.
- In the Name field, enter @ to denote the default domain for email delivery.
- In the Value field, enter mx.zoho.com and in the Priority field, enter 10.
- Select the shortest possible time in the TTL drop-down and click Add record.
Repeat the steps to add the second and third MX records and their priorities.
Note:
- The values of the records with respect to GoDaddy will be given on the ื๎ะยฒฉฒสอ๘ีพ Mail Admin Console's DNS Mapping page. You can copy-paste the values into the respective fields in the DNS Manager.
- Ensure that you have deleted all the MX records related to your previous email provider. Any other existing MX record will conflict with ื๎ะยฒฉฒสอ๘ีพ Mail, affect email delivery, and result in a permanent loss of emails delivered. Refer to Multiple MX records for more details.
- The MX records that should be returned when you check in the MX Lookup tool should be:
- mx.zoho.com
- mx2.zoho.com
- mx3.zoho.com
- Follow the below instructions to add the SPF records:
- Select Add from the top right of your existing DNS records. The existing DNS records appear.
- Select TXT from the Type drop-down list.
- Specify the Name as @ and enter v=spf1 include:zohomail.com -all in the Value field.
Select the shortest possible time in the TTL drop-down and click Add record.

Note:
- The values of the records with respect to GoDaddy will be given on the ื๎ะยฒฉฒสอ๘ีพ Mail Admin Console's DNS Mapping page. You can copy-paste the values into the respective fields in the DNS Manager.
- In case you are using only ื๎ะยฒฉฒสอ๘ีพ Mail to send emails, remove all the other SPF record types from the DNS. Click 'Save Changes' again to save all the changes.
- Having multiple SPF records will interrupt the SPF check and hence the SPF validation may fail and the emails will end up as Spam in the recipient servers. For more details, refer to Using additional entries instead of multiple SPF Records.
- Follow these steps to add the DKIM records:
- Select Add from the top right of your existing DNS records. The existing DNS records appear.
- Select TXT from the Type drop-down list.
- In the Name field, enter the domain key value from Admin Console's domain setup page. The domain key will be different in the case of a different selector.
- In the Value field, enter the v=DKIM1; k=r**; p=....**** value from Admin Console's domain setup page.
Select the shortest possible time in the TTL drop-down and click Add record.
Note:
It may take anywhere between 4 to 48 hours for your DKIM record to propagate. You can check the validity of your DKIM record .
After you add all three records, return to the domain setup page in ื๎ะยฒฉฒสอ๘ีพ Mail Admin Console and click Verify All Records. It may take about an hour or two for you to receive emails upon successful verification of your MX records and 4 to 48 hours for the propagation of SPF and DKIM records.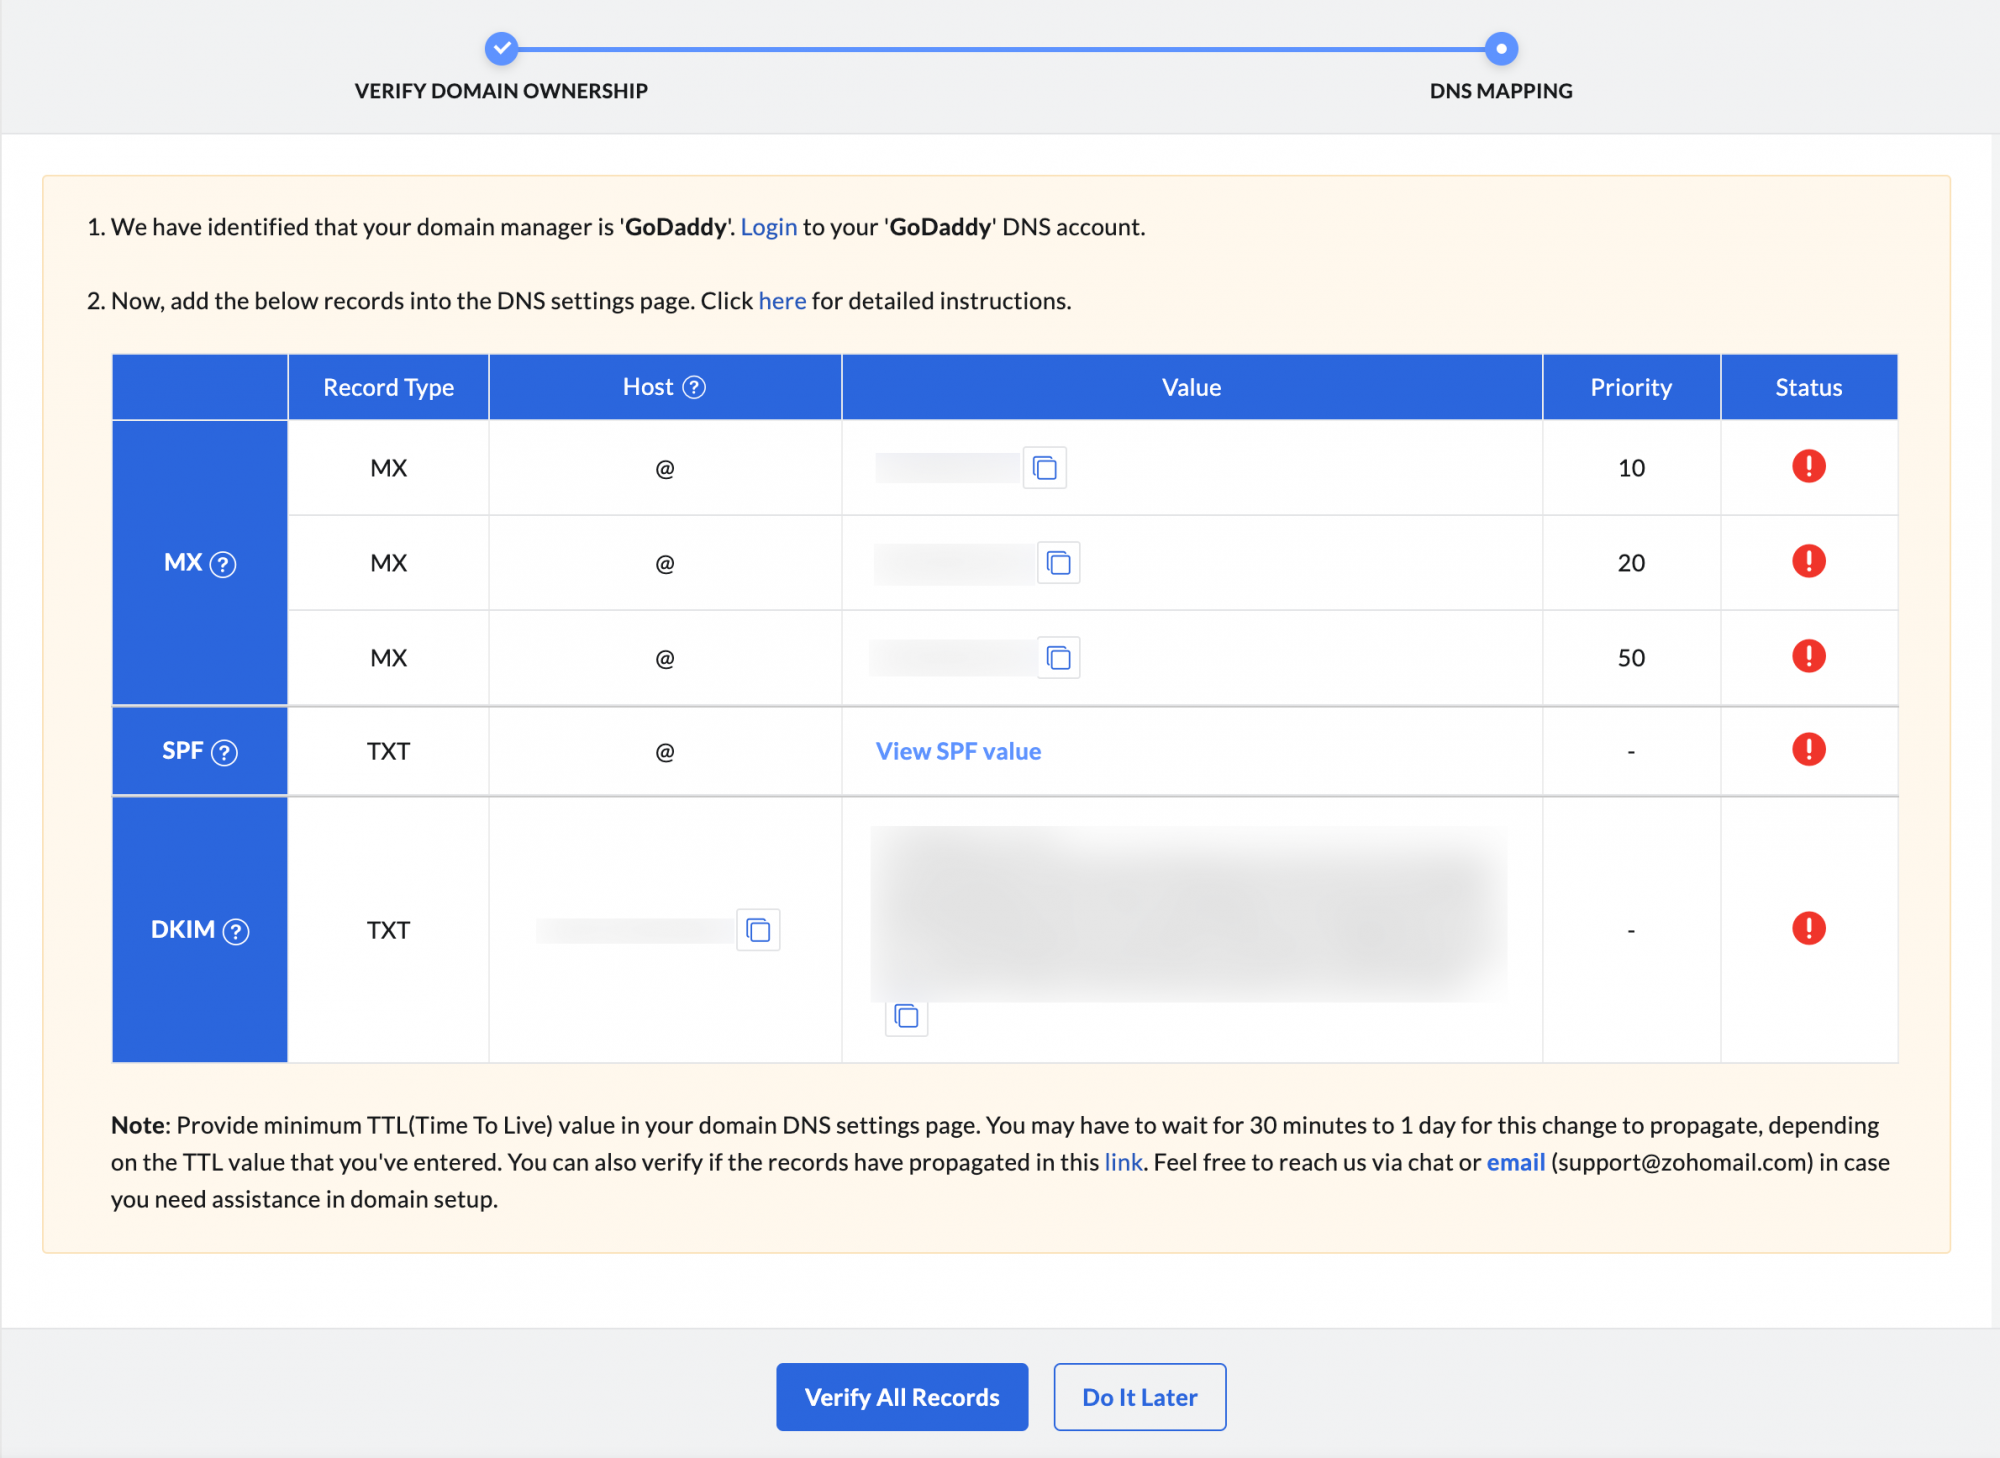 โ
โ